
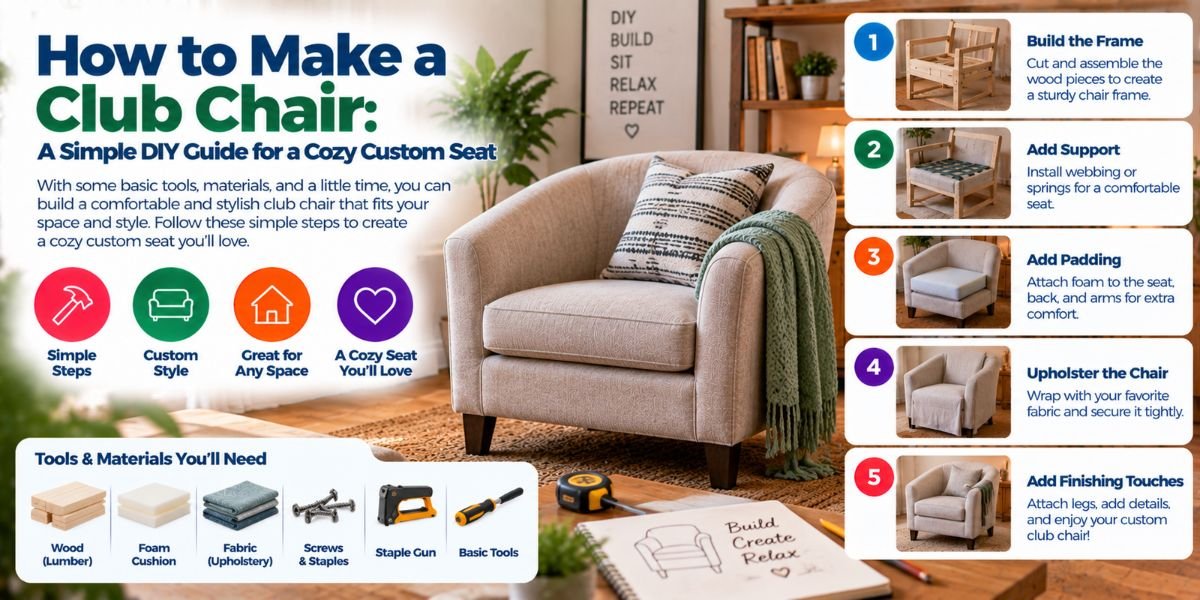
A club chair can make a room feel warm and inviting. Its deep seat, thick arms, and soft shape make it a great spot to read, rest, or watch TV.
But buying one can be costly. Making one yourself can be a better option if you enjoy simple home projects.
In this guide, I’ll walk you through how to make a club chair from the frame to the final fabric. I’ll keep the steps simple and focus on the parts that need the most care.
What Is a Club Chair?
A club chair is a large, comfortable armchair with a deep seat and padded sides. It often has a low back and wide arms.
Traditional club chairs were often covered in leather. Today, you can find them in fabric, faux leather, velvet, and other materials.
The basic design is simple. You need a strong frame, firm support, foam, padding, and an outer cover.
The exact design can change. Some club chairs have exposed legs. Others have a solid base that reaches the floor.
What You Need to Make a Club Chair
Before you start, gather all the main materials.
You will usually need:
- Plywood or solid wood for the frame
- Wood screws
- Wood glue
- Furniture foam
- Polyester batting
- Upholstery fabric
- Upholstery thread
- A staple gun
- Upholstery staples
- Scissors
- Measuring tape
- Pencil
- Drill
- Saw
- Sandpaper
- Sewing machine, if needed
- Upholstery needles
You may also need webbing, springs, or another seat-support system.
The exact materials depend on the chair design.
For a first project, I would keep the frame design simple. A basic box-style frame is easier to measure and build than a complex curved frame.
Plan the Club Chair Size First
Do not start cutting wood until you know the final size.
Measure the space where you want to place the chair. Think about both width and depth.
A typical club chair is fairly large. You need enough room for the arms, seat, back, and padding.
Also think about who will use the chair.
A taller person may want a deeper seat and higher back. A smaller person may find a very deep seat less comfortable.
Write down your target measurements before cutting anything.
A simple plan can include:
| Part | What to Measure |
|---|---|
| Overall width | Outside of one arm to the other |
| Overall depth | Front edge to the back |
| Overall height | Floor to top of chair |
| Seat width | Space between the arms |
| Seat depth | Front of cushion to back |
| Seat height | Floor to top of seat |
| Arm height | Seat to top of arm |
| Back height | Seat area to top of back |
These measurements give you a basic roadmap.
Build the Main Frame
The frame is the foundation of your club chair.
Start by building the lower base. Cut your wood pieces to the measurements in your plan. Check each piece before attaching it.
Use wood glue and screws to join the parts.
Keep the frame square as you work. Measure both diagonal corners. If the measurements are different, the frame may be out of square.
That small error can cause trouble later.
Next, add the supports for the seat. These pieces carry much of the user’s weight, so they need to be strong.
Add extra support where needed.
Do not rush this part. A soft cushion cannot fix a weak frame.
Build the Arms
Club chair arms are one of the most noticeable parts of the design.
Build a frame for each arm and attach it firmly to the base.
Try to keep both sides the same size. Measure from several points rather than assuming your cuts are identical.
The arms will later receive padding. Keep this in mind when choosing their final size.
If you make the wooden arms too wide, the finished chair can become much larger than planned.
Once both arms are attached, check the chair from the front.
The two sides should look even.
Add the Back Frame
The back needs strong support but does not have to be complicated.
Build the rear frame and connect it to the base and arms.
You can make the back straight or give it a slight angle.
A small backward angle can make the chair feel more relaxed.
Check the angle before adding padding. Once the foam and fabric are installed, changing the frame becomes much harder.
Add Seat Support
The cushion needs a firm surface underneath it.
There are several ways to create seat support. You can use wood panels, furniture webbing, springs, or another suitable support system.
The choice depends on the design and the level of comfort you want.
A solid wood seat is simple to build, but it may need a thick cushion for comfort.
Webbing can provide more flex.
If you use webbing, attach it tightly and follow a proper crossing pattern. The support should spread weight across the seat rather than leaving weak spots.
Whatever method you choose, make sure it can safely support the finished chair.
Sand the Frame
Before adding padding, sand the wooden frame.
Remove rough edges and sharp corners.
You do not need a perfectly smooth finish everywhere. Focus on areas that may touch the foam, fabric, or your hands.
Pay special attention to the outer corners.
Sharp wood edges can damage upholstery over time.
This is also a good time to check every screw and joint.
The frame should feel solid when you push or pull on it.
Choose the Right Foam
Foam has a big effect on how your club chair feels.
You need foam that is suitable for furniture seating. Very soft foam may feel comfortable at first but can lose its shape faster.
Very firm foam can make the chair feel stiff.
For the seat, choose a quality furniture-grade foam with enough support for regular use.
The back can use softer foam than the seat.
Before cutting, measure the areas several times.
Foam can be expensive, so careful measuring can save both material and money.
Cut and Attach the Foam
Cut the foam to match each padded section.
Start with the seat.
Then work on the back, arms, and other areas.
Use an appropriate upholstery adhesive when needed to hold the foam in place.
Do not cover the foam with fabric yet.
Sit back and inspect the shape.
Look for areas that feel too thin, too hard, or uneven.
It is much easier to fix foam before the final fabric goes on.
Add Polyester Batting
Batting helps soften the shape of the chair.
It also helps the fabric sit more smoothly over the foam.
Wrap the batting around the padded sections. Pull it gently as you attach it.
Do not pull so hard that you flatten the foam.
Keep the surface smooth.
Extra care around the arms and corners can make a major difference in the final appearance.
If the batting has folds, they may show through thin fabric.
Measure the Upholstery Fabric
Now comes one of the most important steps.
Measure each section before cutting your fabric.
Do not assume one large piece will cover everything.
You may need separate pieces for:
- The outside back
- Inside back
- Seat
- Seat cushion
- Inside arms
- Outside arms
- Front base
- Back base
- Arm fronts
Add extra fabric around the edges for attaching and adjusting.
It is better to have a little extra fabric than to discover that a piece is too short.Read moreHow to Make a Club Chair: A Simple DIY Guide for a Cozy Custom Seat
Cut the Fabric Carefully
Place your fabric on a clean, flat surface.
Mark each piece before cutting.
If your fabric has stripes, checks, or a repeated pattern, pay close attention to direction.
The pattern should line up where the pieces meet.
This takes more fabric and more planning, but it can make the finished chair look much cleaner.
For plain fabric, the process is easier.
Still, mark the top, bottom, inside, and outside of each piece.
Upholster the Club Chair
Start with the areas that are easiest to control.
A common approach is to cover the inside sections first and then work toward the outside.
Pull the fabric evenly.
Staple one area, then move to the opposite side. Keep working back and forth rather than finishing one whole side at once.
This helps keep the tension balanced.
Do not place all the staples too close together at the beginning.
Use a few temporary staples first. Check the fabric. Make adjustments. Then add the final staples.
This can save you from removing a large number of staples later.
Take Extra Care With the Arms
The arms can be one of the hardest parts of upholstering a club chair.
They have several curves and corners.
Pull the fabric slowly around these areas.
Avoid creating large folds.
Small folds can sometimes be hidden underneath the chair or along less visible areas. Visible folds on the front of the arms are much harder to hide.
If you are new to upholstery, take your time here.
A slow, careful approach usually gives a better result than trying to finish quickly.
Make the Seat Cushion
The seat cushion gives you another chance to add comfort and style.
Cut the foam to the required size.
Then cut the fabric for the top, bottom, and sides.
You can sew the cover together if you have a sewing machine that can handle upholstery fabric.
Add a zipper if you want the cover to be removable.
A removable cover is useful because it makes cleaning easier.
Make sure the finished cushion fits the chair without being too tight.
Finish the Bottom
After the visible upholstery is complete, clean up the bottom of the chair.
Trim excess fabric where needed.
You can cover the underside with a suitable dust-cover material for a cleaner finish.
Check all staples.
Make sure none are sticking out where they could scratch a floor or hurt someone.
This final check is easy to skip, but it matters.
Add the Legs or Base
If your design uses legs, install them after the main upholstery work is complete.
Make sure they are attached to strong parts of the frame.
Do not attach heavy-duty legs to thin decorative panels.
If the chair uses a solid base, check that it sits level on the floor.
A chair that rocks can be annoying to use and may put extra stress on the frame.
Common Problems When Making a Club Chair
DIY upholstery can have a learning curve.
One common problem is loose fabric.
If the fabric is not pulled evenly, it can look wrinkled.
Another problem is uneven foam.
Small differences can become obvious once the fabric is stretched over the chair.
Poor frame alignment can also cause problems.
If one arm is higher than the other, the final chair may look uneven.
The best solution is to check your work at every stage instead of waiting until the end.
How to Make a Club Chair Look Professional
Good planning makes the biggest difference.
Keep your measurements consistent.
Use sharp cutting tools.
Cut fabric carefully.
Take your time when shaping the foam.
When upholstering, work slowly around corners.
Also choose fabric that suits the chair.
A heavy upholstery fabric can be easier to work with than a very thin material. The right fabric can also hold its shape better during regular use.
If this is your first upholstery project, a simple solid-color fabric can make the process easier because you do not need to match a pattern.
How Much Does It Cost to Make a Club Chair?
The cost depends on what materials you already have and what type of chair you want to build.
Wood, foam, fabric, batting, hardware, and upholstery tools can all add to the total.
If you already own basic woodworking tools, your material cost may be lower.
If you need to buy every tool and material, a DIY chair may not always be cheaper than a ready-made chair.
The main advantage can be customization.
You can choose the size, fabric, foam feel, arm shape, and overall look.
For me, that is one of the strongest reasons to make furniture yourself.
Is Making a Club Chair Worth It?
Making a club chair can be worth it if you enjoy DIY work and want a custom piece.
It takes time and patience.
The frame needs to be strong. The foam needs to be shaped well. The fabric needs to be cut and attached carefully.
If you want a quick chair with little effort, buying one may be easier.
But if you want to learn upholstery or create a chair that fits your room exactly, building one can be a rewarding project.
Tips for a Better DIY Club Chair
Keep these tips in mind before you start:
- Plan the full size first.
- Measure each part twice.
- Build a strong frame.
- Check that the frame is square.
- Use proper furniture foam.
- Do not rush the batting.
- Add extra fabric for trimming.
- Test fabric placement before final stapling.
- Work slowly around corners.
- Check the chair for stability before using it.
- Make sure every staple is fully secured.
- Keep the design simple if this is your first project.
A careful process will usually give you a better result than expensive materials used without proper planning.
FAQs About Making a Club Chair
Is it hard to make a club chair?
It can be challenging for a beginner because the project combines woodworking and upholstery. A simple frame and basic fabric can make the process easier.
What wood is best for a club chair frame?
A strong plywood or solid wood suitable for furniture can work well. The frame should be designed to handle the weight and stress placed on the chair.
What foam should I use for a club chair?
Use furniture-grade foam made for seating. The seat usually needs more support than the back, so foam firmness should match how the chair will be used.
Can I reupholster an old club chair?
Yes. An old club chair can often be reupholstered if its frame is still strong. Check the joints, seat support, foam, and wood before replacing the outer fabric.
How much fabric do I need for a club chair?
The amount depends on the chair’s size, shape, cushion design, and fabric pattern. Measure every upholstered section and add extra material for trimming and fitting.
Conclusion
Learning how to make a club chair takes patience, but the basic process is easy to understand.
Start with a strong frame. Add proper seat support, foam, and batting. Then measure and attach the upholstery with care.
The biggest lesson is to avoid rushing. Small mistakes in the frame or fabric can become much more visible later.
If you plan each stage before starting, you can build a club chair that fits your space, matches your style, and gives you the comfort you want.