
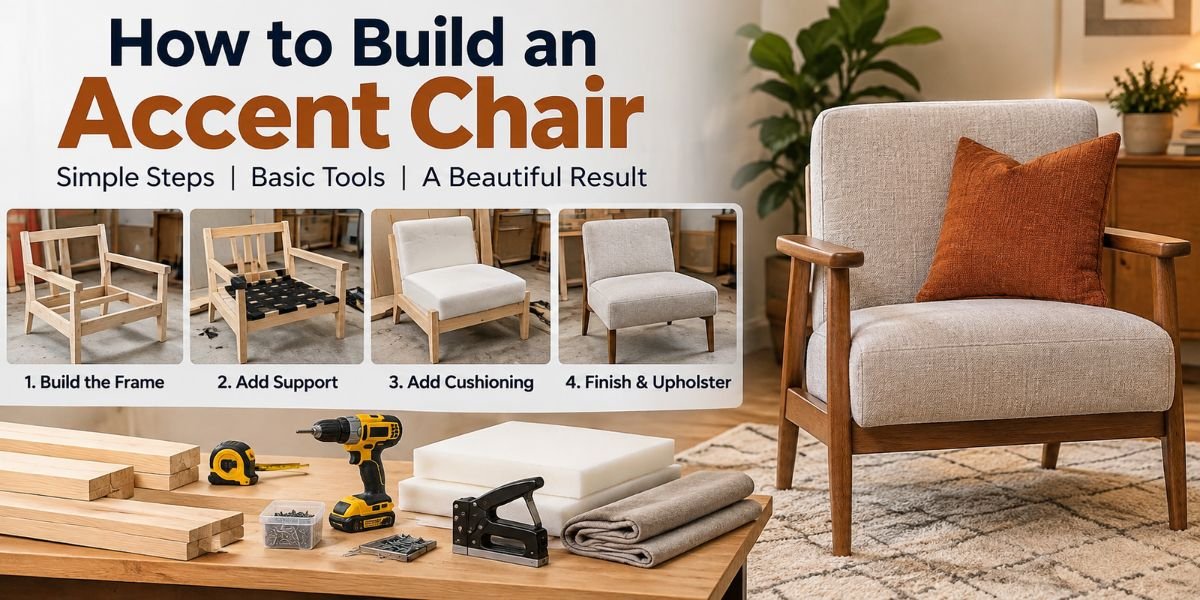
An accent chair can change the feel of a room without taking up much space. I like them because they add a seat, a new texture, and a bit of style at the same time. The best part is that you do not need to build a complex chair from scratch.
If you know how to measure, cut, drill, and attach fabric, you can build a simple accent chair at home. The key is to make a strong frame, keep the seat level, and use enough padding for comfort.
In this guide, I will explain how to build an accent chair step by step. I will also cover the wood, tools, foam, fabric, measurements, common mistakes, and ways to make the finished chair feel more comfortable.
How to Build an Accent Chair
The basic process is simple: plan the chair, build the frame, add the seat and back, install the foam, cover it with fabric, and finish the legs.
A small accent chair does not need a complex design. A simple wooden frame with a padded seat and back can work very well in a living room, bedroom, office, or reading corner.
Before cutting anything, decide how large you want the chair to be. Measure the space where it will sit. Then check that there is enough room to walk around it.
For a basic chair, I would focus on four things first:
- A strong frame
- A comfortable seat height
- A stable base
- Good-quality padding and fabric
Getting these parts right matters more than adding fancy details.
What You Need to Build an Accent Chair
The exact materials depend on your design. A simple upholstered chair can be made with common woodworking and upholstery supplies.
Basic Materials
You may need:
- Plywood or solid wood
- Wood screws
- Wood glue
- Chair legs or wooden feet
- High-density upholstery foam
- Polyester batting
- Upholstery fabric
- Staples
- Sandpaper
- Wood filler
- Paint, stain, or finish
For the frame, choose wood that is straight and free from major cracks. Plywood can also work well for flat panels.
The foam should be made for furniture use. Soft craft foam may feel comfortable at first, but it may not hold up well under daily use.
Tools for the Project
A basic setup can include:
- Tape measure
- Pencil
- Square
- Saw
- Drill
- Screwdriver or driver bit
- Staple gun
- Scissors
- Utility knife or foam cutter
- Sanding block or sander
- Clamps
You do not need every tool listed above. The exact tools depend on the chair design and the materials you choose.
A square is especially useful. It helps keep cuts and frame joints straight. That small detail can make the final chair much easier to assemble.
Plan the Accent Chair Before Cutting Wood
Good planning can save a lot of wood and time.
Start by drawing the chair from the front and side. You do not need a perfect drawing. Just mark the main measurements.
Think about:
- Overall height
- Overall width
- Overall depth
- Seat height
- Seat width
- Seat depth
- Back height
- Arm height, if used
- Leg height
A chair that looks good on paper may still feel wrong if the seat is too high or too deep. So think about how you will sit in it, not just how it will look.
For a small accent chair, keeping the design compact can also make it easier to fit into a bedroom or small living room.
Choose a Comfortable Seat Height
Seat height is one of the first measurements I would check.
A seat that is too low can make getting up harder. A seat that is too high can leave your feet sitting awkwardly on the floor.
Remember that the foam adds height. If your frame has a certain height before padding, the finished seat will be higher after the foam and fabric are added.
This is an easy detail to miss.
I would also think about the thickness of the foam before fixing the final frame dimensions. The finished height matters more than the bare wood height.
Build the Main Frame
Once the measurements are ready, cut the main frame pieces.
A simple accent chair may use:
- Two side frames
- Front and rear supports
- Seat supports
- Back supports
- A seat panel
- A back panel
Dry-fit the pieces before adding glue or screws. This gives you a chance to find measurement errors early.
Use a square to check each corner. Then clamp pieces in place before fastening them.
Wood glue can help create a stronger joint when used correctly, but screws or other suitable fasteners are still important for a chair frame.
Do not rush this part. A frame that moves or twists can cause problems later. Read More How Tall Should an Accent Chair Be? The Easy Height Guide
Add the Seat Support
The seat needs solid support because it carries most of the load.
You can use a plywood seat panel or another suitable support system based on your design. Make sure the support is securely attached to the frame.
Before moving on, press down on the seat area with your hands. Look for movement, flex, or noise.
A little checking now is much easier than taking the chair apart after upholstery.
Build the Backrest
The backrest can be a simple solid panel or a framed structure.
The important part is stability. The back should not wobble when you lean against it.
Think about the angle too. A completely upright back may feel formal. A slight recline can make the chair feel more relaxed.
Do not make the back angle extreme. The chair should still feel balanced and safe when someone sits down.
Add the Legs
Attach the legs after checking the frame.
The legs need to sit evenly so the chair does not rock. Measure from the floor to each attachment point and check the base before final tightening.
Turn the chair over and test it on a flat surface.
If it rocks, do not ignore it. Find the cause before adding foam and fabric.
A small frame error can become much harder to fix once the chair is upholstered.
Sand the Wood
Sand the frame before covering it.
Start with a suitable coarse or medium grit if the wood is rough. Then use a finer grit to smooth the surface.
Pay extra attention to:
- Sharp corners
- Rough edges
- Splinters
- Uneven joints
- Areas near the fabric
You do not need every hidden surface to look perfect. But any edge that may touch the fabric should be smooth.
Sharp wood can cut or wear through upholstery over time.
Add Foam to the Seat
Now the chair starts to look like a real accent chair.
Measure the seat area before cutting the foam. Cut the foam so it fits neatly without large gaps.
The right foam firmness depends on how you want the chair to feel. Very soft foam can feel cozy, but it may allow you to sink too far. Firmer foam can give better support.
For a chair that will be used often, I would not choose foam based only on how soft it feels when you press it with your hand.
The finished chair should support your body without feeling hard.
Add Foam to the Back
The backrest can use a thinner layer of foam than the seat, depending on the design.
Make sure the foam covers the main contact area. Avoid large lumps or gaps.
If the back has curves, cut the foam slowly. Take small amounts off instead of making one large cut.
Once foam is removed, you cannot easily put that same piece back.
Wrap the Foam With Batting
Batting can help create a smoother upholstered surface.
Place the batting over the foam and pull it gently around the frame. Avoid pulling so hard that the foam changes shape.
Staple the material to the underside or rear of the frame where it will not be visible.
Work from one side to the other. Check the front often as you go.
This helps prevent wrinkles and uneven spots.
Choose the Right Upholstery Fabric
Fabric has a big effect on how the chair looks and how long it lasts.
For a chair that gets daily use, choose upholstery fabric made for furniture rather than thin decorative fabric.
Before buying fabric, measure all the areas you need to cover. Add extra material for folding, seams, pattern matching, and mistakes.
If you are new to upholstery, a fabric with a simple pattern can be easier to work with than a pattern that must line up perfectly.
Texture matters too. Some fabrics can hide small marks better than very smooth materials.
Upholster the Seat
Place the fabric over the padded seat and center it.
Start by securing a few staples underneath. Then work around the seat, pulling the fabric evenly.
Do not pull one side very tight while leaving another side loose.
A useful approach is to staple opposite sides first. Then work toward the corners.
Keep checking the top surface. If you see a wrinkle, remove a few staples and adjust the fabric before continuing.
Upholster the Back
The back can be covered in several ways.
For a simple design, the fabric can wrap around the padded back and attach to the rear of the frame.
Pull the fabric firmly enough to keep it smooth, but do not stretch it so much that the pattern becomes distorted.
Corners need extra care. Fold them neatly and keep the folds hidden where possible.
Take your time here. Upholstery is one of those jobs where slowing down often gives a much better result.
Finish the Chair
After the fabric is secure, trim loose material from the underside.
Check every visible area.
Look for:
- Loose staples
- Wrinkles
- Uneven corners
- Exposed wood
- Loose legs
- Frame movement
If the wood will remain visible, apply your chosen stain, paint, or finish before final assembly when possible.
Let the finish dry fully according to its product directions.
Accent Chair Measurements to Think About
The exact dimensions depend on the design and the person using the chair. There is no single size that works for every accent chair.
| Part | What to Check |
|---|---|
| Overall width | Make sure it fits the room |
| Overall depth | Leave enough walking space |
| Seat height | Consider the user’s leg position |
| Seat depth | Make sure the back feels supportive |
| Back height | Match the desired support and style |
| Arm height | Keep it comfortable for resting the arms |
| Leg height | Account for seat and foam thickness |
The most important point is to consider the finished dimensions. Foam, batting, and fabric all add some thickness.
Common Mistakes When Building an Accent Chair
One common mistake is cutting wood before making a complete plan.
A second mistake is forgetting the foam thickness. This can make the finished seat higher than expected.
Another problem is using weak joints. A chair carries repeated loads, so the frame needs to be built with care.
Loose upholstery is another issue. Fabric may look fine at first but develop wrinkles if it is not attached evenly.
I would also avoid skipping the stability check. A chair that rocks is not ready for use.
How to Make a DIY Accent Chair More Comfortable
Comfort comes from more than soft foam.
The seat depth, seat height, back angle, foam firmness, and fabric all affect how the chair feels.
If the seat is too deep, a shorter person may struggle to sit with proper back support. If it is too shallow, the chair may not feel relaxed.
A small cushion can also change the feel of the chair without changing the frame.
Before finishing the design, think about who will use it most. A chair for reading may need different support from a chair used for short visits.
How to Make the Chair Look More Expensive
A clean finish usually matters more than an expensive material.
Focus on straight seams, smooth corners, even fabric tension, and a stable frame.
You can also improve the look with simple details such as tapered legs, a neat wood finish, or a well-chosen fabric.
Do not add details just for decoration. A simple chair with good proportions can look better than a complex chair with poor construction.
How Long Does It Take to Build an Accent Chair?
The time depends on the design, tools, materials, and your skill level.
A simple chair may take a weekend for someone who already has basic woodworking and upholstery skills. A more detailed chair can take much longer.
Cutting and building the frame may be fairly quick. Upholstery can take more time than expected, especially when you are learning how to handle corners and fabric tension.
I would set aside extra time for mistakes and adjustments rather than trying to finish the entire chair in one short session.
Is Building an Accent Chair Worth It?
Building your own accent chair can be worth it if you enjoy DIY work and want control over the size, fabric, wood, and style.
It also lets you make a chair for a space that has unusual dimensions.
The downside is that DIY furniture takes time. You also need the right tools and a safe place to work.
If you want a quick seat with no construction work, buying one may be easier. If you want a custom piece and enjoy making things, building one can be a rewarding project.
Tips for a Better DIY Accent Chair
Keep these tips in mind before you start:
- Measure the room first.
- Draw the chair before cutting wood.
- Account for foam thickness.
- Check every frame corner for square.
- Test the chair for movement before upholstery.
- Sand rough edges well.
- Use furniture-grade foam for regular use.
- Buy enough fabric for mistakes.
- Staple upholstery evenly.
- Check the finished chair for stability before using it.
These small steps can prevent many common problems.
FAQs
Is it hard to build an accent chair?
It can be challenging for a first-time DIYer, but a simple design is manageable. Basic woodworking and upholstery skills make the project much easier.
What wood is best for an accent chair?
Straight, strong wood is a good choice for the frame. Plywood can also work well for some chair parts, especially flat panels.
What foam should I use for an accent chair?
Use upholstery foam made for furniture. Choose the firmness based on how much support and softness you want from the seat and back.
How much fabric do I need for an accent chair?
The amount depends on the chair size, design, fabric width, and pattern. Measure every covered part and add extra for folds, seams, and mistakes.
Can I build an accent chair without sewing?
Yes. Some simple chair designs can be upholstered with staples instead of sewn covers. This can make the project easier for beginners.
Conclusion
Learning how to build an accent chair is easier when you break the project into small steps. Start with a strong frame, plan the finished measurements, and check the chair for stability before adding padding.
The upholstery then gives you a chance to add your own style. Take your time with the foam, batting, and fabric because small mistakes are easy to see on the finished chair.
For me, the best DIY accent chair is not the most complex one. It is the one that fits the room, feels good to sit in, stays stable, and looks clean when the project is done.